Lino printing, also known as linocut, is a fascinating printmaking technique that offers endless possibilities for creativity. Whether you’re a seasoned artist or a curious beginner, lino printing can be a fulfilling and accessible way to express your artistic vision. This article will take you through the essentials of lino printing, from its history and tools to step-by-step instructions and creative ideas to help you get started.
What is Lino Printing?
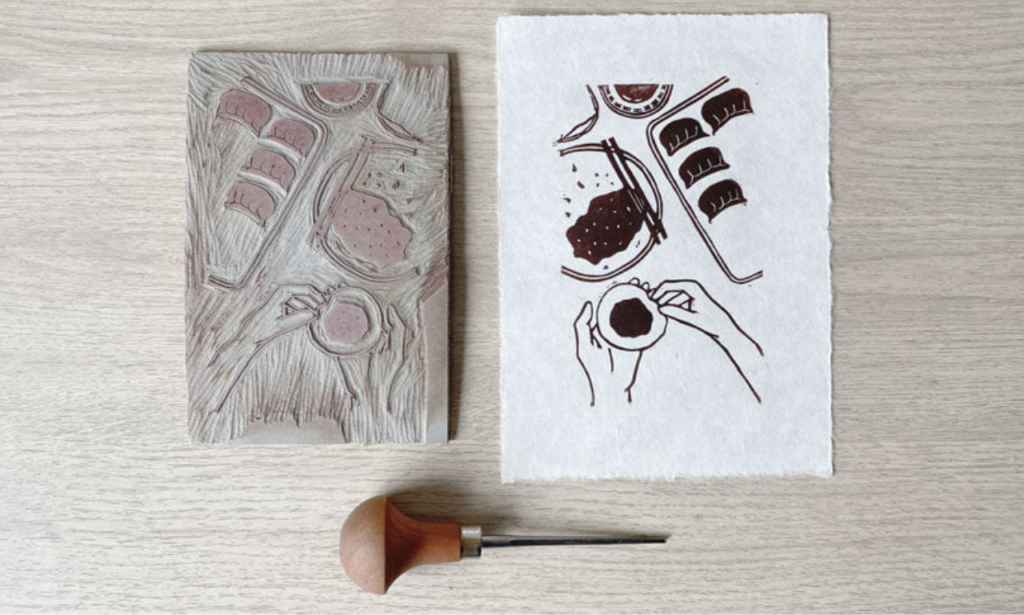
Lino printing is a form of relief printmaking where the artist carves an image into a sheet of linoleum, inks the raised areas, and then presses it onto paper or fabric to create a print. The process is similar to woodcut printing, but linoleum is softer and easier to carve, making it an excellent medium for detailed designs and experimentation.
A Brief History of Lino Printing
Lino printing emerged in the early 20th century as an alternative to traditional woodcut printmaking. It quickly gained popularity among artists for its versatility and ease of use. Some of the most famous artists who have used lino printing include Pablo Picasso and Henri Matisse, who explored the medium’s potential in their work. Today, lino printing continues to be a beloved technique for artists of all levels.
Why Choose Lino Printing?
Lino printing offers several advantages that make it an appealing choice for artists:
- Accessibility: Linoleum is relatively inexpensive and easy to find, making it a great option for beginners.
- Ease of Use: The material is softer and more forgiving than wood, allowing for smoother carving and more intricate designs.
- Versatility: Lino prints can be made on various surfaces, including paper, fabric, and even walls, offering endless creative possibilities.
- Reproducibility: Once you’ve carved your design, you can create multiple prints, each with its unique charm.
Essential Tools and Materials for Lino Printing
Before diving into the process, it’s important to gather the necessary tools and materials. Here’s a list of what you’ll need:
1. Linoleum Block
The linoleum block is the surface you’ll carve your design into. It comes in different sizes and thicknesses. Some blocks are mounted on wood for extra stability, but you can also use unmounted linoleum.
2. Carving Tools
Carving tools are essential for creating your design. A basic set usually includes a variety of gouges (V-shaped and U-shaped blades) that allow you to carve fine lines or remove larger areas of linoleum.
3. Ink
Lino printing ink is a special kind of ink that is thick and sticky enough to adhere to the linoleum but still transfer smoothly to your printing surface. Water-based inks are easier to clean up, while oil-based inks provide richer colors and longer drying times.
4. Brayer (Roller)
A brayer is a small roller used to evenly apply ink to the linoleum block. It ensures that the ink is spread consistently across the surface, which is crucial for achieving a clean print.
5. Printing Surface
The surface you print on can vary depending on your project. Paper is the most common choice, but you can also print on fabric, such as tote bags or T-shirts, or even on walls for a more permanent design.
6. Baren or Spoon
A baren is a flat, round tool used to press the paper onto the inked linoleum block, ensuring even contact. If you don’t have a baren, a large spoon can work as a substitute.
7. Cutting Mat and Bench Hook
A cutting mat protects your work surface while you carve, and a bench hook holds the linoleum block steady, preventing it from slipping as you work.
Step-by-Step Guide to Lino Printing
Now that you’ve gathered your materials, let’s go through the process of creating a lino print. Follow these steps to bring your design to life:
1. Prepare Your Design
Start by sketching your design on paper. Remember that the final print will be a mirror image of your sketch, so if your design includes text or directional elements, be sure to reverse them. Once you’re satisfied with your design, transfer it onto the linoleum block using tracing paper or by drawing directly on the block with a pencil.
2. Carve the Linoleum
Using your carving tools, carefully carve out the areas of the design that you want to remain white (uninked). The raised areas will hold the ink and create the image. Take your time and carve in stages, starting with the larger areas and moving to the finer details. Always carve away from your body to avoid accidents.
3. Ink the Block
Squeeze a small amount of ink onto a smooth surface, such as a glass or acrylic sheet, and use the brayer to roll out the ink until it’s evenly distributed. Then, roll the ink onto the linoleum block, making sure to cover all the raised areas. The goal is to achieve an even, thin layer of ink on the block.
4. Prepare the Paper
Cut your paper to the desired size and place it on a clean, flat surface. If you’re printing multiple copies, it’s a good idea to mark the position of the block on the paper to ensure consistent placement.
5. Print Your Design
Carefully place the inked linoleum block face down onto the paper. Use a baren or spoon to press down firmly and evenly over the entire block, ensuring that the ink transfers to the paper. Gently lift the block to reveal your print. If the print isn’t as bold as you’d like, you can apply more pressure or add a bit more ink.
6. Dry and Clean Up
Let your prints dry completely in a safe place where they won’t be smudged or disturbed. Clean your linoleum block and tools with water (for water-based ink) or a suitable solvent (for oil-based ink) to keep them in good condition for future use.
Creative Ideas for Lino Printing
Lino printing is incredibly versatile, and there are countless ways to explore its creative potential. Here are a few ideas to inspire your next project:
1. Custom Greeting Cards
Design and print your own greeting cards for holidays, birthdays, or special occasions. Handmade cards are a thoughtful and personal way to show you care, and they can be cherished keepsakes for the recipient.
2. Fabric Prints
Experiment with printing on fabric to create custom T-shirts, tote bags, or even home decor items like pillowcases and tea towels. Fabric inks are designed to withstand washing, so your designs will last.
3. Multi-Color Prints
Once you’re comfortable with single-color prints, try creating multi-color designs by carving separate linoleum blocks for each color. This technique requires careful registration (alignment) of the blocks, but the results can be stunning.
4. Patterned Wallpaper
Use lino printing to create your own patterned wallpaper. Carve a repeating design and print it on a large scale to transform a room with your unique artistic touch.
5. Limited Edition Prints
Create a limited edition series of prints by numbering and signing each one. This adds value to your work and makes each print a collectible piece of art.
Tips for Successful Lino Printing
As you explore lino printing, keep these tips in mind to improve your technique and achieve the best results:
- Start Simple: If you’re new to lino printing, begin with simple designs that focus on bold shapes and lines. As you gain confidence, you can move on to more intricate patterns and details.
- Practice Carving: Carving linoleum takes practice, so don’t be discouraged if your first attempts aren’t perfect. Keep practicing, and you’ll soon develop a feel for the tools and material.
- Experiment with Inks: Different inks can produce varying effects. Experiment with water-based, oil-based, and even metallic inks to see what works best for your projects.
- Test Prints: Before committing to your final paper or fabric, do a few test prints on scrap material. This allows you to check the ink coverage and make any necessary adjustments.
- Store Your Blocks: Keep your carved linoleum blocks in a safe, dry place. They can be reused many times, so take care of them, and they’ll last for years.
Conclusion
Lino printing is a rewarding and accessible art form that allows you to create beautiful, original prints with just a few basic tools. Whether you’re interested in producing fine art, custom home decor, or personalized gifts, lino printing offers endless opportunities for creative expression. With practice and experimentation, you’ll find your unique style and enjoy the satisfaction of seeing your designs come to life.
So why not give lino printing a try? Gather your materials, sketch out a design, and start carving. The possibilities are limitless, and the results are truly one-of-a-kind. Happy printing!